
Mission: (Project Description)
In this project the student will be introduced to the process of encapsulated mold making. Rubber will be used as an interior jacket to collect surface and surface detail. A plaster exterior mother mold will be used to establish structure for the flexible mold. Rubber is an elastic material that can pick up very minute detail. Its flexible quality allows it to be pulled and stretched to cast challenging objects that can not be cast from a more rigid material. The mold material can be used numerous times with many different materials, respectively.
Objective Guidelines:
In this project the student will be asked to create one encapsulated mold of an object that are student found or instructor determined difficulty and scale. A well crafted mold and it’s ability to function (creates clean multiples) will be the main objectives.
Scale:
Objects that fit in the palm are fair game for this assignment. See the instructor approval of larger forms. Rubber materials may be purchased by the student if forms require more rubber material.
Collecting and inventory:
Bring in objects to choose from. Complex forms, miniatures, toy parts, jewelry, small machine parts, containers, etc.
Pour Spout:
MUST BE IN PLACE for usability: This has to be a functional mold for plastic and wax. A pour hole must be planned and in place before rubber processes and materials are in motion.
Craftsmanship:
The objective here is to create well crafted-functional mold. Pay attention to the aesthetics involved in this process.
Sketchbook Assignment:
Draw your objects, develop plan view drawings that will assist in creating the mold. Plan pour hole, with flanges. Plan for mold keys in rubber jacket and mother mold.
Material/Structure:
Rubber and plaster components should work well together, So that they do not damage one another while in process.
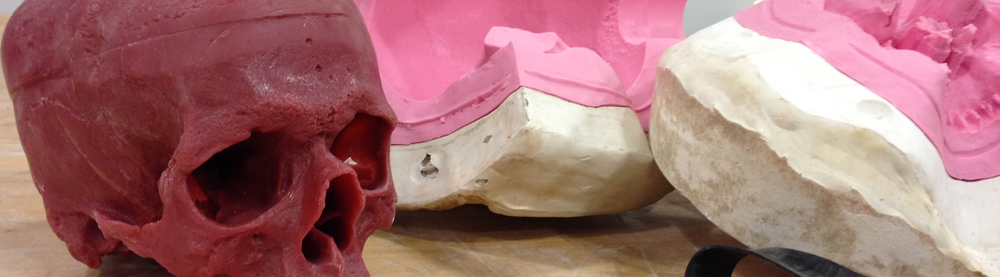
Encapsulated Rubber: Process Steps:
Two part Mother Mold/Two part Rubber Jacket:
- Find horizon line of pattern object
- If pattern is porous, apply sealing agent
- Pour spout (funnel) must be planned and added in the next steps
- Venting for casting material must be planned and added in the next steps
- Note undercuts, voids and trouble spots in pattern, “clay_up” to accommodate
- Build “clay-up” to object horizon line on work board
- Manage undercuts, voids and trouble spots in pattern, “clay_up” to accommodate
- Leave margin for rubber flange/keys, plaster mother mold and keys
- Keys may be placed/cut in clay up at this point (for Rubber and Plaster)
- Cover object with plastic and clay blanket (1/4 inch thickness)
- Build “Flange” at top of Pour spout (funnel)
- Build “Jacket” keys on clay blanket if needed
- Release agent may be applied to clay (Petroleum jelly, Oil soap)
- Clamp coddle boards around clay up and pattern
- Seal potential leeks, seams
- Mix plaster to ready
- A flick coat of plaster should be applied if detail is compromised
- Pour plaster over pattern blanket area
- Level to one inch over highest part of pattern
- Tap sides of coddle boards to evacuate air in plaster
- Allow to harden
- Remove coddle boards
- Remove plaster mother mold half
- Determine deepest area of mother mold
- Establish a pour hole (Funnel for rubber)
- In other deep areas of mother mold, venting will need to be established (Straw vents)
- Apply release agent to plaster (Petroleum jelly, Oil soap)
- Add venting and funnel
- Remove clay blanket and plastic
- Note clay weight for future reference (Rubber material may be determined by this)
- Note clay volume for future reference (Rubber material may be determined by this)
- Keys for rubber should be placed/cut in “clay up” at this point
- A trench around the pattern works well (loop tool)
- Clean any debris from pattern and clay areas
- Apply release agent to pattern
- Replace plaster mother mold half with venting and funnel
- Replace coddle boards
- Secure mold (Straps)
- Seal potential leeks, seams
- Determine amount of rubber material needed
- Prepare rubber by product direction
- Pour into funnel until vents and funnel are level
- Allow to settle, add more if needed,
- Allow to cure
- Flip first half of mold with pattern and clay up
- Remove clay up
- Do not separate pattern and rubber from mother mold
- The first mother mold half will preside as the basis for the second half
- Keys should be placed/cut into plaster at this point if not previously placed/cut
- Follow steps from above for second half
Reminders:
- Apply release agent to pattern
- Seal potential leeks, seams
- Review, Review, Review: Review that processes have been completed
- Gently separate mold halves at seam line
- Remove pattern and prep for use
Tools and Materials:
• Eye Protection/Safety Glasses
• Sketch Book
• Clay Tools
• Fettling knife
• Trimming Tools (Various sizes)
• Loop, wire and ribbon tools
• Wooden modeling tools
• Needle Tool
• Calipers
• Canvas (approximately 2ft x 2ft)
• Plasticine (Oil Based clay)
• Clay -Water Based clay (Optional)
• Wax tools
• Dust Mask/Particulate Respirator
• Pattern
• Mold materials: Plaster and Two part Rubber compound (Pourable)
• Release agent: Petroleum jelly
• Release agent: Silicone spray
• Release agent: Oil soap (Optional)
• Drinking straws for vents
• Clamps (4)
• Materials for coddle boards)
• Wood Shop
• Measuring Tape
• Meal Ruler
• Rubber or Latex gloves (optional)
• Ratchet Straps, rubber straps
Create a label for your project with these specifics:
• Name:
• Dimensions: HWD
• Materials:
• Year Complete:
• Course:
Tape your label to your project. Use masking tape so that it will not harm your project.
Objectives:
- Method: Planning, techniques and strategies
- Material Characteristics: Plaster and tin-cured silicone rubber compounds
- Mold Making Process: Encapsulated Rubber Molds
- Volume: HWD
- Mold Gating/Sprue Methods
- Wax Casting Process
- Successful Casting
- Fabrication techniques: Mold fabrication, Object duplication
- Functional and Aesthetic qualities
- Sensibility to form and craft: Good design and Clean aesthetics
- Integrity of the artist to their craft
Evaluation:
- Work ethic: Participation in and out of class
- Scheduling: Students stay on task, project finished by deadline, critique.
- Well Engineered and Functional mold for long term use.
- Craftsmanship and aesthetics: Well crafted mold with well crafted “Clean”castings.
Caution:
Some materials used in this project are toxic. Please observe the Material Safety Data Sheet (MSDS) of materials that you will be exposed to. Be aware, if you notice an allergic reaction such as skin or eye irritation as a result of use of these materials, please inform the instructor and seek health services. Eye protection and rubber gloves are mandatory during the use of these materials. Some materials have MSDS information online. Work in a well ventilated area.
Uses:
- Wax patterns: Wax castings in preparation for lost wax casting.
- Plastic casting: Prototypes or finished castings.
- Resin casting: Prototypes or finished castings.
- Ceramic: May have some ceramic applications.
Supplemental Videos: YouTube Demos: marquezart.com
For a quick preview or review of this process please visit the YouTube channel marquezart.com:
This series of supplemental videos are time lapsed to give an overview of the four part encapsulated rubber mold making process. They serve to assist in learning the process as a component of demonstrations in a tutorial setting. Some simple mold making experience is suggested before taking on this challenge. There is much to learn from experience.
Actual mold making time for a four part encapsulated rubber mold will vary with the pattern and mold maker experience. This particular mold took approximately four days once you consider waiting times for materials to cure.
- Part 001 Encapsulated Rubber Mold
- Part 002 Encapsulated Rubber Mold
- Part 003 Encapsulated Rubber Mold
- Part 004 Encapsulated Rubber Mold
- Part 005 Encapsulated Rubber Mold
- Part 006 Encapsulated Rubber Mold
- Part 007 Encapsulated Rubber Mold
- Part 008 Encapsulated Rubber Mold
- Part 009 Encapsulated Rubber Mold
- Part 010 Encapsulated Rubber Mold
- Part 011 Encapsulated Rubber Mold
- Part 012 Encapsulated Rubber Mold
- Part 013 Encapsulated Rubber Mold
- Part 014 Encapsulated Rubber Mold
- Part 015 Encapsulated Rubber Mold
- Part 016 Encapsulated Rubber Mold