Hot Metal Casting: Lost Wax Process

Perry_Beauty is in the Eye of the Beholder_2008Mission: (Project Description)

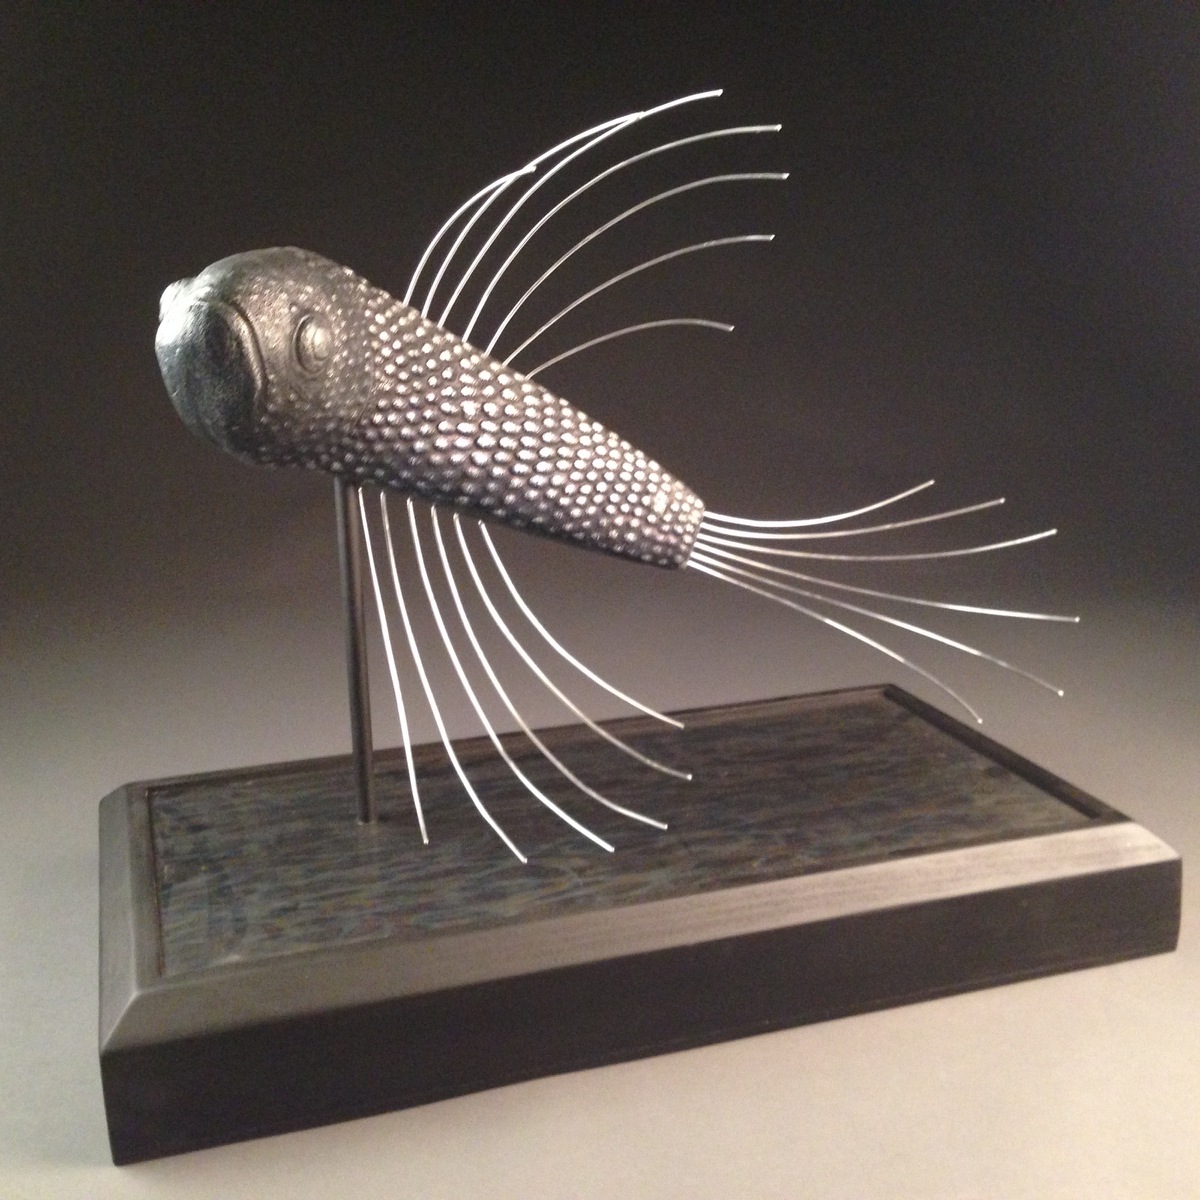
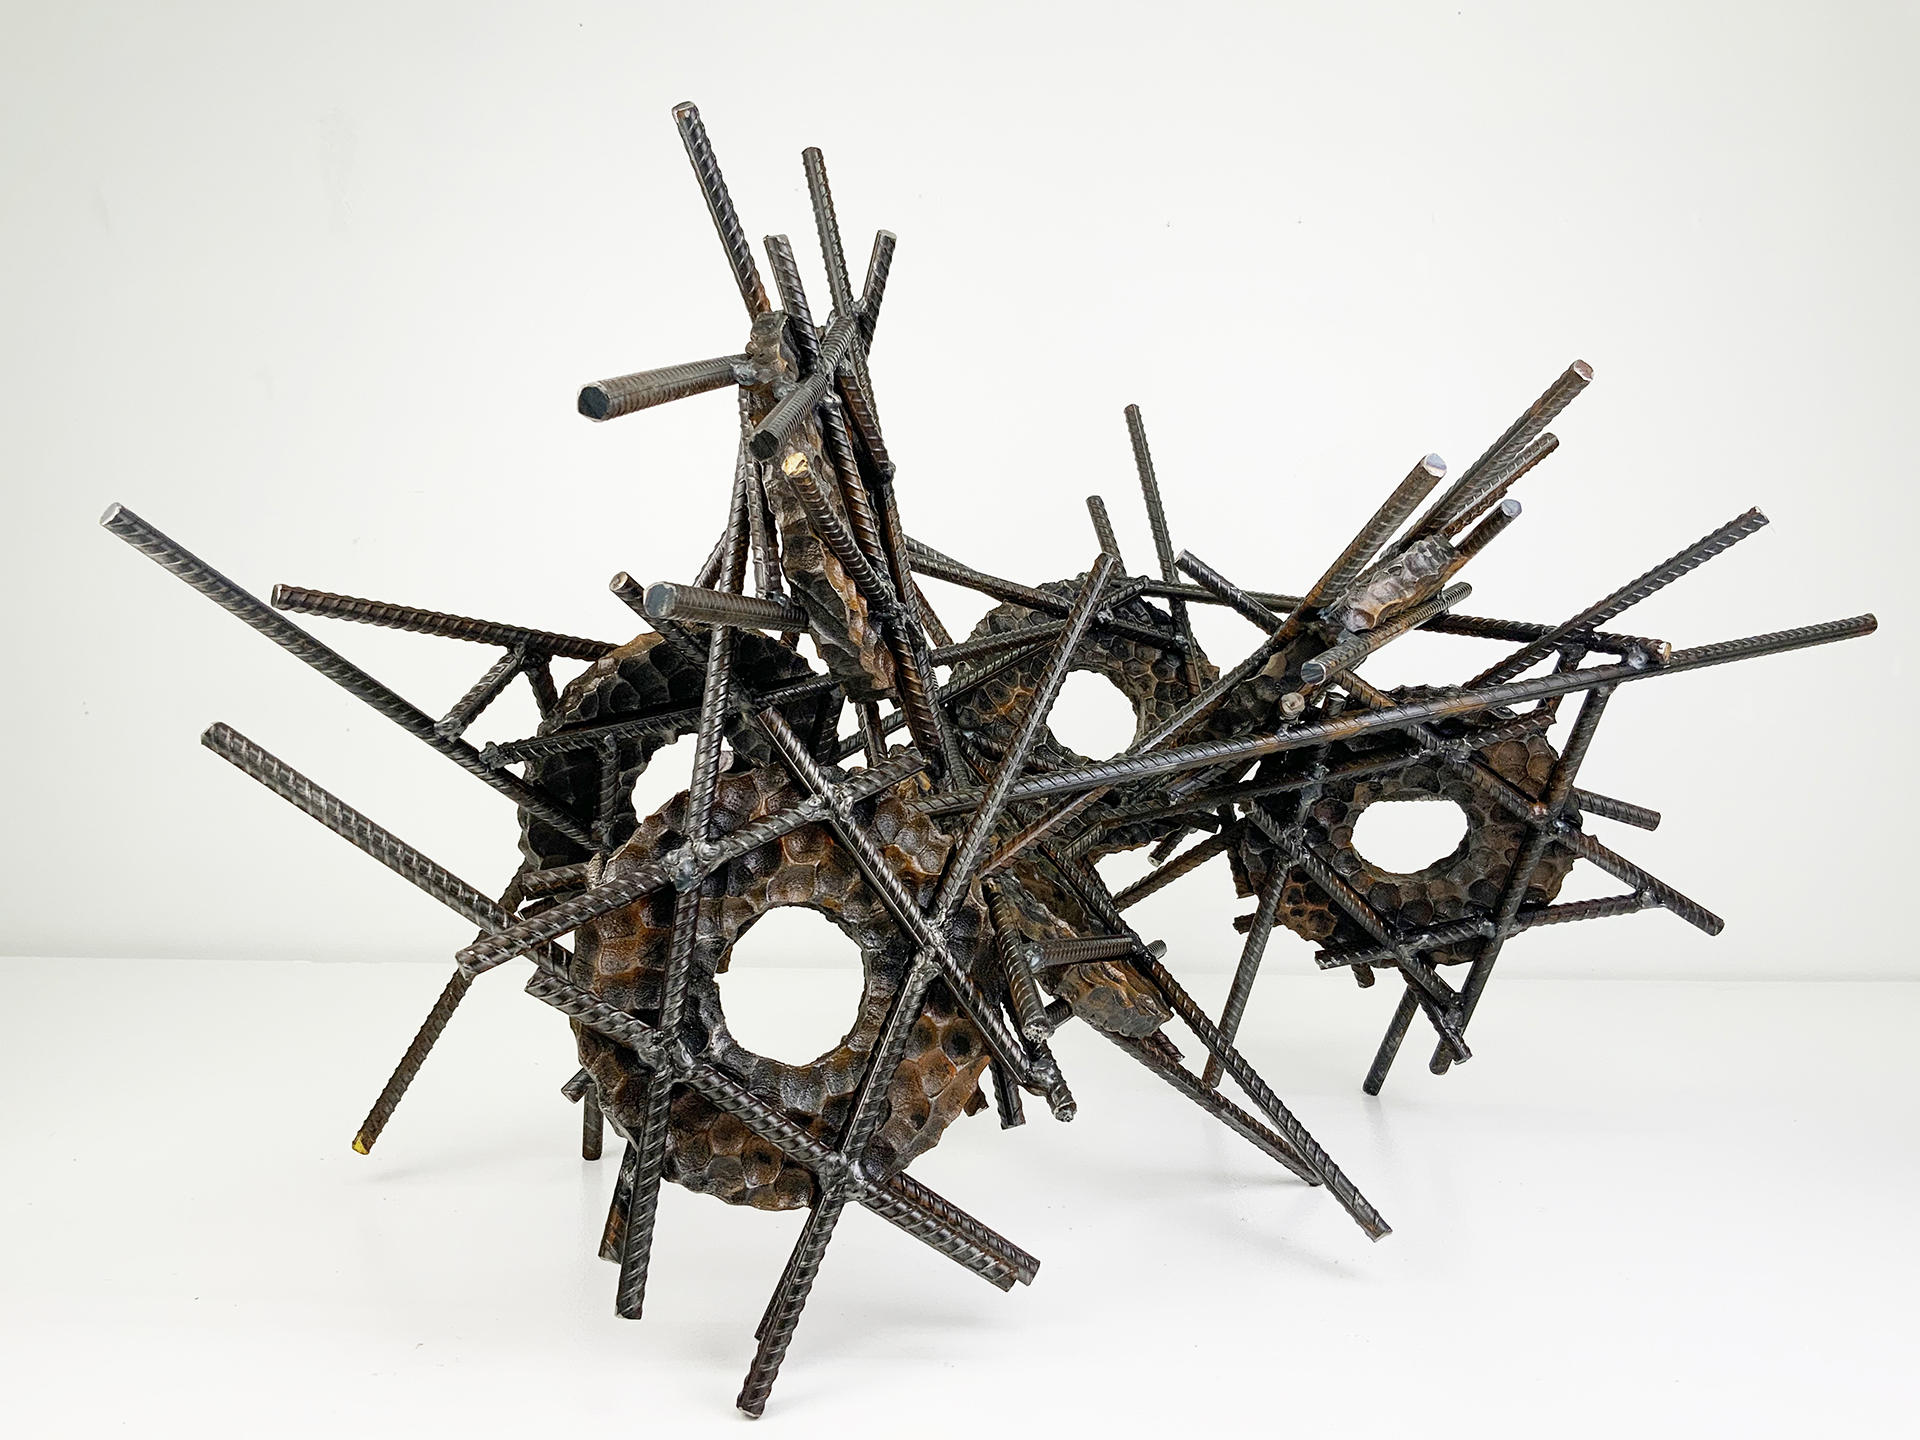
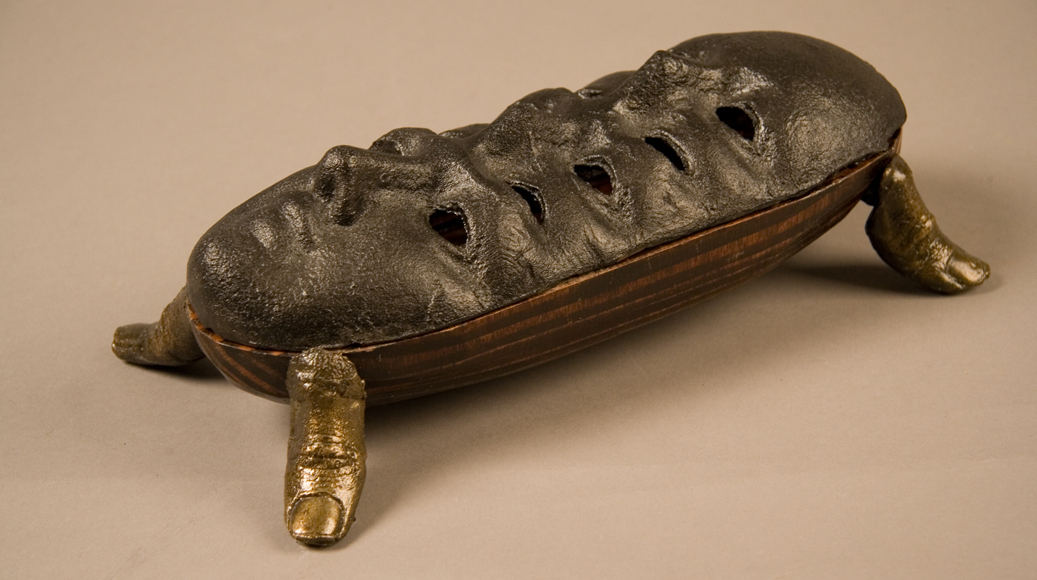
Hollow lost wax casting method: A unique wax pattern will be developed using plaster and rubber molds. The wax pattern will be taken through the “Lost Wax Process” to create a unique bronze or aluminum sculpture with a patina or alternative finishing method. Individual students have a choice to cast a wax form presented from a previous course or to create a new hollow casting for this project. A hollow lost wax casting method is the only technical criteria. If a new casting is to be produced, you are encouraged to create a composition and concept that pushes the envelope of this level course.

This project will challenge and further introduce the student to the processes of casting metal. A traditional investment material of plaster, silica sand and silica flour will be used for this project. The student should show an understanding of the methods listed below. A metal form will be cast and finished by the student.

Assignment:

For this assignment you are asked to build a 3- dimensional sculpture using at least three different wax elements. Wax welding will be used to bring these forms together in a well developed composition. You are encouraged to develop a sculpture that projects this level course. Create a form that suggest a concept that will engage your audience. Keep in mind that you should make some formal and technical decisions about visual balance, weight, interior and exterior form, proportion and other elements of design.

• Create a wax pattern. Plaster and rubber molds may be utilized.
• Include a hollow form in the composition.
• Assemble wax composition pattern from multiple wax objects.
• While building, consider casting methods and techniques, air traps, venting strategies.
• Create wax gating and runners from plaster molds.
• Create string vents.
• Gate, vent and prepare wax pattern to be cast.
• Prepare investment flask and chicken wire support.
• Invest wax pattern in Plaster/Silica Sand/Silica flour Investment mold.
• Wax will be burned out in kiln, This s a three day process. Plan for this in advance.
• Cast object in metal: This will be a team coordinated effort.
• De-invest pattern from investment mold.
• Remove gating from the casting.
• Metal Finish: Fasten or weld if necessary, chasing, grinding and filing.
• Metal Finish: “Patina”, chemical treatment of metal surface.
• Seal the form in wax or other finish.

Reliquary Component: (Optional)

Build a reliquary for your final chosen object. This reliquary can take on many forms but should house your form with absolute intent. The marriage between object and reliquary should make sense and have a good balance to focus the audience towards your work. Again craft is very important. Below is a list of types of reliquary objects and materials acceptable for the project.

• Wood: Sculpted, hollowed out, or fabricated wood structures
• A well designed/crafted crate may be fabricated as well.
• Plaster, plastic or wax castings of the body or other objects.
• Note: Plaster can be sculpted cast and  hollowed out to hold an artifact.
• Installations: Consider the idea that a reliquary is much like a shrine
• Metals fabrication/containers
• Glass
• Plastics
• Books: Sculpted, hollowed out, or fabricated structures
• Paper, books, and cardboard:

It is expected that the concept and fabrication of the reliquary and the marriage to the object, be convincing. Challenge yourself to meet the aesthetic and craft related to your object or concept and to the echelon of this course.

Craft:

Set yourself up for success. Craftsmanship should be strongly considered in developing a “good” pattern. Strive for craftsmanship even in the gating system. These considerations will make de-gating and finishing a much easier task once the form is in metal. Take care and don’t rush the process and the process will work for you rather than against you.

Hot Wax:

Wax is very hot, be careful in handling molds during casting and when welding wax. Red casting wax temperature should be between 250 and 300 degrees F.  Do not let wax smelter get too shallow. If there is no wax to fill it, turn it off. Wax should be left on continuously during our use. If you are the last one in the studio and leaving for the day, turn it down to 250 degrees F.

Alternative Materials:

Other material may be explored with instructor approval.

  • Natural Materials (Use your imagination)
  • Cotton cloth
  • Wood
  • 3d printed PLA and ABS

Larger Forms and Post Fabrication:

Scale: The sculpture scale is limited to the designated size in which the foundry can accommodate for this class. Plan ahead, measure the size of the burn-out kiln before you create a mold that will be too large for the kiln interior volume. Forms can be post fabricated. Think ahead. Think Modular. Design larger forms with smaller components that can be cast and fastened together to create the final larger form. Post fabrication techniques includes tap and die, screwing, bolting, keyed, welding, etc.

Kiln: You should keep a three inch perimeter around your mold away from the kiln interior wall to allow an even distribution of heat around the mold. Allow 6 inches of space for height. Shelving or kiln brick should be used to support your mold off the kiln floor. Kiln should be vented to allow moisture and carbon to escape.

Clean-Up Reminders:

Wax Work:

Cover the table surface when using wax: Use thick plastic, metal or cardboard to cover the tables and work areas. If these are unavailable cover your work area with newspaper.

Plaster Work:

Use newspaper to protect the table surfaces.

Investment:

A traditional investment material of plaster, sand and silica flour will be used for this project. To assist in clean up a layer of cardboard may be placed under your investment flask. Clean up accordingly, removing waste to dumpster behind sculpture.

Metal pour:

As a team you all will be in charge of coordinating and implementing metal pours. Primarily, your instructor will be available to assist in some process and technical questions and to observe. All pours should be scheduled during class times.

De-Investing:

When de-investing, remove the waste material to the dumpster. This material gets too heavy for one person to clean up. A metal garbage can, hand truck or cart may be used to transport the material to the dumpster. Just remember, If you make a mess, clean it up!

Wear appropriate clothing during foundry pours.

• Cotton clothing, pants and shirt.
• Leathers or Fire resistant suits
• Safety Glasses
• Safety shield
• Hard Hat-welding cap
• Leather covered shoes (Steel toed preferred)
• Leather chaps or leggings
• Leather spats
• No Poly blends, No Pleather: These can be extremely flammable near the pouring activities.

Tools and Materials:

• Eye Protection/Safety Glasses
• Dust Mask/Particulate Respirator
• Sketch Book
• Clay Tools
• Hot knife or soldering tool
• Hobby knife
• Fettling knife
• Trimming Tools (Various sizes)
• Loop, wire and ribbon tools
• Wooden modeling tools
• Needle Tool
• Wax smelting pot
• Wax
• Wax tools
• Materials for cast pattern
• Mixe media
• Adhesives, fastening materials
• Wood
• Wood Shop
• Metal
• Rubber or Latex gloves• Metal: Aluminum, Bronze, Iron
• Casting Foundry/Furnace
• Welding Eye Protection
• Welding Gloves
• Angel Grinder
• Grinding disc
• Cut off disc
• Flap Disc

Type of facilities and furnace will designate what casting metals will be used.

Create a label for your project with these specifics:

• Name:
• Dimensions: HWD
• Materials:
• Metal casting weight:
• Year Complete:
• Course:

Tape your label to your project. Use masking tape so that it will not harm your project.

Objectives:

  • Method: Planning, Cutting Safely, Building techniques and strategies
  • Material Characteristics:
  • Three-Dimensional Pattern and mold Making
  • Volume: HWD
  • Fabrication techniques: Wax and metal casting fabrication, Object creation
  • Mold Gating/Sprue Methods
  • Hot Metal Casting Process
  • Successful Casting
  • Metal Fabrication techniques: Post Casting fabrication, Object Installation
  • Structural and Aesthetic qualities
  • Finishing Techniques: Heat and chemical surface treatments
  • Sensibility to form: Good design, clean aesthetics
  • Integrity of the artist to their craft
  • Conceptual development

Evaluation:

  • Work Ethic: Participation in and out of class
  • Scheduling: Students stay on task, project finished by deadline, critique.
  • Well Engineered and Functional mold
  • Craftsmanship and aesthetics: Well crafted mold with well crafted “Clean”castings.
  • Post Fabrication and Insatlation
  • Conceptual development

Caution:

Chemicals and fumes: This process uses chemicals and materials that might be dangerous for some people. Read the MSDS (Material Safety Data Sheet) for questionable materials. Use a respirator and rubber or latex gloves while using chemicals. A dust mask may be used rather than a respirator. The respirator will provide much better protection. Be aware, if you notice an allergic reaction such as skin irritation as a result of use of  any materials used, please inform the instructor.

Hot Wax: This project will incorporate hot wax and wax welding tools. Be careful for yourself and when working around others. Safety and a disciplined studio etiquette should be followed during all studio activities. Hot tools will burn, be careful to not place them on any surface that will burn or melt. Be aware of people working around you. Turn off or unplug tools when leaving unattended.

Foundry: This project will incorporate the use of the foundry and “Extremely Hot Metal”. Safety and a disciplined studio etiquette should be followed during metal pours and all studio activities.

Note: Ceramic Shell and other casting methods may be used as an alternative to this project, with instructor approval.


You tube Video:

Wax Gating for Lost Wax Process: Hollow Patterns 

Research/Inspiration:

U-Ram Cho
Kris Kuksi
Christian Marclay
Tim Hawkinson
Andrew Werby
Louise Bourgeois  PBS
Jessica Joslin
Kathie Olivas and Brandt Peters
Elizabeth King
Ron English
Steve Dilworth
Sophie Kahn
Becky McDonah
Christopher Conte
Ashley Wood

Project Gallery

Hot Metal Casting: Sand Molds

06_Wheatley_Toxic Swimmer_2014

Mission: (Project Description)

In this project the student will learn the process of developing a metal casting using a two-part sand resin bond mold. The first part of the project will be to create a pattern using a variety of methods and materials. Mixing sand and resins the student will create a mold. The mold will be used to create a void to be poured in metal. The metal sculpture will then be finished accordingly. The student will be graded by keeping schedule with the processes of the assignment as well as the finished form. Keep up, so you do not fall behind.

Sketchbook Assignment:

Sketches of your ideas should be rendered before and during sculpting. A minimum of five pages should be dedicated to this sketching component. In addition, find a minimum of four cast sculptures or objects that inspire you. Printed images of these sculptures or objects should be placed in your sketch book. Your sketch book will be graded along with your project.

Project Tasks:

Metal casting: Create a metal casting using an original student created pattern and a multi-part sand-resin bond mold.

  1.  Form: Create a pattern, Open to individual concepts.
  2. Surface: Form should have at least two textures that create balance in the form and surface, yet contrast significantly.
  3. Movement: Form and surface should draw the viewer around the form  
  4. Multi-Part mold: Using the pattern, sand-resin bond will be used to create the components of the sand mold.  Gating: A gating system will be carved into the mold parts to allow metal to be poured into the cavity left by the pattern.
  5. Yoke: Create a yoke system for the mold.
  6. Casting: Pour the sculpture in metal.
  7. De-gating and Metal finishing: Prepare the form for patina.
  8. Patina/Surface Treatment: Patina or dye-oxide
  9. Sealant: Seal the finished form.

Pattern Note:

Create a pattern using a material that will pull out of your mold: clay, wood, paper, styrofoam and many other materials may be used. Your pattern should be well crafted. Create a draft in your pattern so it pulls from the mold more easily.

Pattern dimensions should be approximately 4.5 x 8 x 2  inches. This is the smallest dimension. Due to material availability consult the instructor before executing larger forms. Realize… the larger the form, the larger the mold, equals more work and material cost.

Wood Shop Note:

Before cutting any materials in the wood shop, Make sure all staples and metals are removed from the material. Make an extra effort to affirm that no screws or nails remain in purchased or reclaimed materials.

Group Participation:

• Mold Making: Group Engagements: There will be several Sand Parties to create the “Sand-Resin Bond” molds. This will be a class endeavor, where sand and chemicals will be mixed and rammed at the same time to reduce waste. Absence or lack of participation during these events will have an effect your grade. Excess sand from this process should be promptly rammed into Scratch block molds.

• Metal Casting: Group Engagement:  The form will be cast in metal using the foundry. Casting crews and task will be designated. Attendance and participation offer much to the experience. Absence or lack of participation during these events will have an effect your grade.
Wear appropriate clothing during foundry pours. 

• Cotton clothing, pants and shirt.
• Leathers or Fire resistant suits
• Safety Glasses
• Safety shield
• Hard Hat-welding cap
• Leather covered shoes (Steel toed preferred)
• Leather chaps or leggings
• Leather spats
• No Poly blends, No Pleather: These can be extremely flammable near the pouring activities.

Tools and Materials:

• Sketch Book
• Dust Mask/Particulate Respirator
• Safety Glasses
• Protective clothing: Leathers
• Materials for pattern
• Mold materials
• Sand
• Sand resin chemicals
• Wood
• Wood Shop
• Metal: Aluminum, Bronze, Iron
• Casting Foundry/Furnace
• Rubber or Latex gloves
• Welding Eye Protection
• Welding Gloves
• Angel Grinder
• Grinding disc
• Cut off disc
• Flap Disc

Type of facilities and furnace will designate what casting metals will be used.

Create a label for your project with these specifics:

• Name:
• Dimensions: HWD
• Materials:
• Metal casting weight:
• Year Complete:
• Course:

Tape your label to your project. Use masking tape so that it will not harm your project.

Objectives:

  • Method: Planning, Cutting Safely, Building techniques and strategies
  • Material Characteristics:
  • Three-Dimensional Pattern Making
  • Mold Making Process: Cope and Drag
  • Volume: HWD
  • Mold Gating/Sprue Methods
  • Hot Metal Casting Process
  • Successful Casting
  • Fabrication techniques: Post Casting fabrication, Object Installation
  • Structural and Aesthetic qualities
  • Finishing Techniques: Heat Treated Patina
  • Sensibility to form: Good design, clean aesthetics
  • Integrity of the artist to their craft

Caution:

Chemicals and fumes: This process uses chemicals and materials that might be dangerous for some people. Read the MSDS (Material Safety Data Sheet) for questionable materials. Please use a respirator and rubber or latex gloves while using chemicals and chemically treated sand. A dust mask may be used rather than a respirator. The respirator will provide better protection.

Foundry: This project will incorporate the use of the foundry and “Extremely Hot Metal”. Safety and a disciplined studio etiquette should be followed during metal pours and all studio activities.


Research and Inspiration:

Project Gallery

Welding Line-Form-Repetition

Ward_72Mission: (Project Description)

Create a sculptural form/structure that develops from the linear quality of welded  and fabricated metal. The final form should have a sense of variety and repetition of elements. Add a skin to some or all components of the structure. Develop an aesthetic in the connection of skin to form.

It is expected that a concept be developed that will draw the viewer into a transformed space. A linear form should be the initial aesthetic, creating a structure that defines a new space. Lines, shapes and forms may be curved or straight, yet artist intent must be obvious and well crafted.

Sketchbook Assignment:

Sketches of your ideas should be rendered before and during sculpting. A minimum of five pages should be dedicated to this sketching component. Documentation is a critical learning habit. Not only does it record growth and provide reflection, it will foster new ideas. Printed images of inspirational sculptures or objects should be placed in your sketch book as well. Your sketch book will be graded along with your project.

  • Draw as you create.
  • Draw what you create.
  • Photograph as you create.
  • Take notes.

Fabrication:

Form: Beyond line, develop a composition that creates or entraps volume as shapes create form. Do not build a flat 2-dimensional drawing.

  • Welding will be the primary fastening technique.
  • Other fastening techniques are encouraged.
  • Welds should be clean. Relative: no Slag, no whiskers.
  • Use the grinder to clean your welds.
  • Re-weld if needed.

Skin:

Other materials are not only encouraged but expected. Greatly consider how materials are secured to the structure. Develop aesthetics in the way skins are connected and use them wisely and consistently. Look for texture in the materials search for. Add texture with other materials such as tar, acrylics, and resins.

Display:

  • Build a form that can stand on a surface, project off the wall or hang from the ceiling.
  • Choose and design wisely. Aesthetics and good design should be greatly considered.
  • When engineering, developing, and building fastening devices and supports for sculpture, stay away from obtrusive devices that may take away from the concept or aesthetics of the work.

Installation:

  • Make sure the design works.
  • If free standing, make a structure that is self supporting.
  • If the form will be a wall hung piece, a well engineered mounting strategy should be developed to secure the work to a wall.
  • If the form will be a ceiling hung piece, a well engineered mounting strategy should be developed to secure the work to the ceiling.
  • Allow space for fasteners such as screws to be tightened during installation.
  • Test your designs before final installation and critique.

Material/Structure:

Sculpture will be made of bent and welded 1/4 inch metal rod and other metals and “skin” materials introduced by the student.

Scale: (HWD)

A minimum of 30 ft of metal rod will be used for this project. Additional material may be purchased to build the form. Final Dimension of Sculpture: The minimum range to shoot for is 2 ft x 3 ft x 1 ft.

Craft and Aesthetics:

A high degree of craft is expected in the fabrication. If wall or ceiling mounted, remember to allow space for fasteners such as screws to be tightened with ease for installation. This is often missed and installation becomes difficult. The skins should be consistent and foster a cohesive visual conversation to the viewer.

Finish:

A metal finish should be considered for exposed areas. Ends of rod should be well finished/polished with a grinder. A polish, patina or paint may be used. Absolutely, no spray paint in the shop. If spray painting, work outside or in a spray booth. Place a protective material such as newspaper on all surfaces under and around the work area, even the concrete floor. Prep; clean, sand and use a primer before metal is painted. Most metals have an oil on them that will resist paint and surface treatment. It is a good idea to clean the materials before you begin the project. Sanding before cutting and welding will be beneficial.

Tools and Materials:

Safety Glasses
Measuring tape
Welding Eye Protection
Welding Gloves
Welding Leathers (option: thick flannel shirt)
Angel Grinder
Grinding disc, Cut off disc, Flap Disc
1/4 inch rod/ Mild Steel Hot rolled (HR)
1/8 inch rod/ Mild Steel Hot rolled (HR)
Wire: Rebar Wire (good for modeling form or fastening)
Sand paper/ steel wool
Solvents, To clean oil off the metal
Finishing materials, Primer, Sealers/Paint.
Other materials for skin and attaching materials (Wire, string)

Create a label for your project with these specifics:

  • Name:
  • Dimensions: HWD
  • Materials:
  • Year Complete:
  • Course:

Tape your label to your project. Use masking tape so that it will not harm your project.

Caution:

Protective Gear required: Wear appropriate eye protection, clothing and shoes while welding. UVs from the welders can burn skin and damage eyes, much like the sun, not to mention the metal will be hot after a weld. Use leather welding gloves while working around the metal shop. Assume that metals are “Hot” before picking them up. Be careful when picking them up.

Fumes: Be aware that some metals can be hazardous and some are not compatible with others, In other words lets stick with what we know, steel. When welding, stay away from anything covered in a zinc allow, such as galvanized metals. Galvanized metals can be potentially dangerous, as the zinc will form a thick vapor that is hazardous to our health.

Research:

Lee Bontecou
Eric Stephenson
Alexander Calder
Robert Klippel
Lynn Chadwick
Sol Lewitt
James Turell
Rebecca Horn
Antony Gormely
Rachel Whiteread
Richard Serra
Joseph Beuys
Bruce Nauman
Tony Cragg
Piet Mondrian

Project Gallery

Scratch Block Molds – Casting Forms in High Relief

Sheen Square72In this project the student will learn the process of developing a “Relief” metal casting using a Scratch Block, a sand block bonded with resin, to create a the negative or inverse of a final relief sculpture. Metal will be poured in the scratch block to create the finished form. The metal relief sculpture will be finished, chased using metal working tools. Then a dioxide and wax will be applied to the surface. And finally a strategy must be developed to display the relief form.

  1. Carve a relief form/composition into the scratch block. Your composition is open to your imagination. Develop a composition of your own design or from observation. Stay away from trite or cliche logos. Sketch your composition in your sketchbook in advance so that the image will fit the format.
  2. The forms should be developed off the back panel so that the objects are sculptural, three dimensional. This sculptural quality should utilize undercuts to create shadows as well as subtle transitions from dark to light foreground and background. Basically the forms should protrude off the panel or frame creating contrasting values, strong and subtle highlights and shadow.
  3. The relief form/composition in the scratch block is now considered a “Mold”. Metal will be used to fill the mold to create a “Casting”.
  4. Group Engagement: The form will be cast in metal using the foundry. A pour crew will be developed from the class to execute the metal pour.
  5. Chasing the form: Finish the form in its metal state in preparation for surface treatment. You will be using metal finishing tools: electric and pneumatic grinders, files, sand paper, steel wool, and other polishing tools.
  6. Apply a patina to the form by adding a Dye-oxide to color the form. Steel wool can be used to polish highlights on the form. Wax may be used to seal the form from further oxidation.
  7. Develop a mounting strategy to present the piece on the wall or other form of presentation for critique. Try to develop a system that is un-obtrusive or does not overwhelm your composition. Keep It Simple, Less is more.

Note: This process uses chemicals and materials that might be dangerous for some people. Read the MSDS (Material Safety Data Sheet) for questionable materials. Please use rubber gloves and a dust mask while using chemicals and chemically treated sand.

This project will incorporate the use of the foundry and “Extremely Hot Metal”. Safety and a disciplined studio etiquette should be followed during metal pours. Wear proper clothing if you intend to assist in the pour. No poly or poly blend clothing. 100 % Cotton clothing, leather covered shoes, safety glasses, Leathers and safety shields are required for this process.

Materials needed for this project:

  • Sand resin scratch block
  • Tools for scratching into sand mold, Metal tools work well.
    Steel wool
  • Foundry gear
  • Metal: Aluminum will be used for this project.
  • Two part adhesive (Epoxy)
  • Materials for mounting or presentation strategy.

Cost:

If you wish to keep your sculpture, You are required to pay for the metal. Your aluminum piece will cost $4.00, if you wish to keep it.

Note: It is important to remember that to get a right reading image you should create any text and your image in a mirror image format on/in your mold. Be conscious in developing your relief sculpture, forms that you wish to fall back in the finished image area should project forward in your mold. Areas that you desire to protrude forward should fall back in your mold. It might fair you well to build a simple model (clay) of the desired forms to assist in developing these concepts and to have something to work from.

Student Gallery