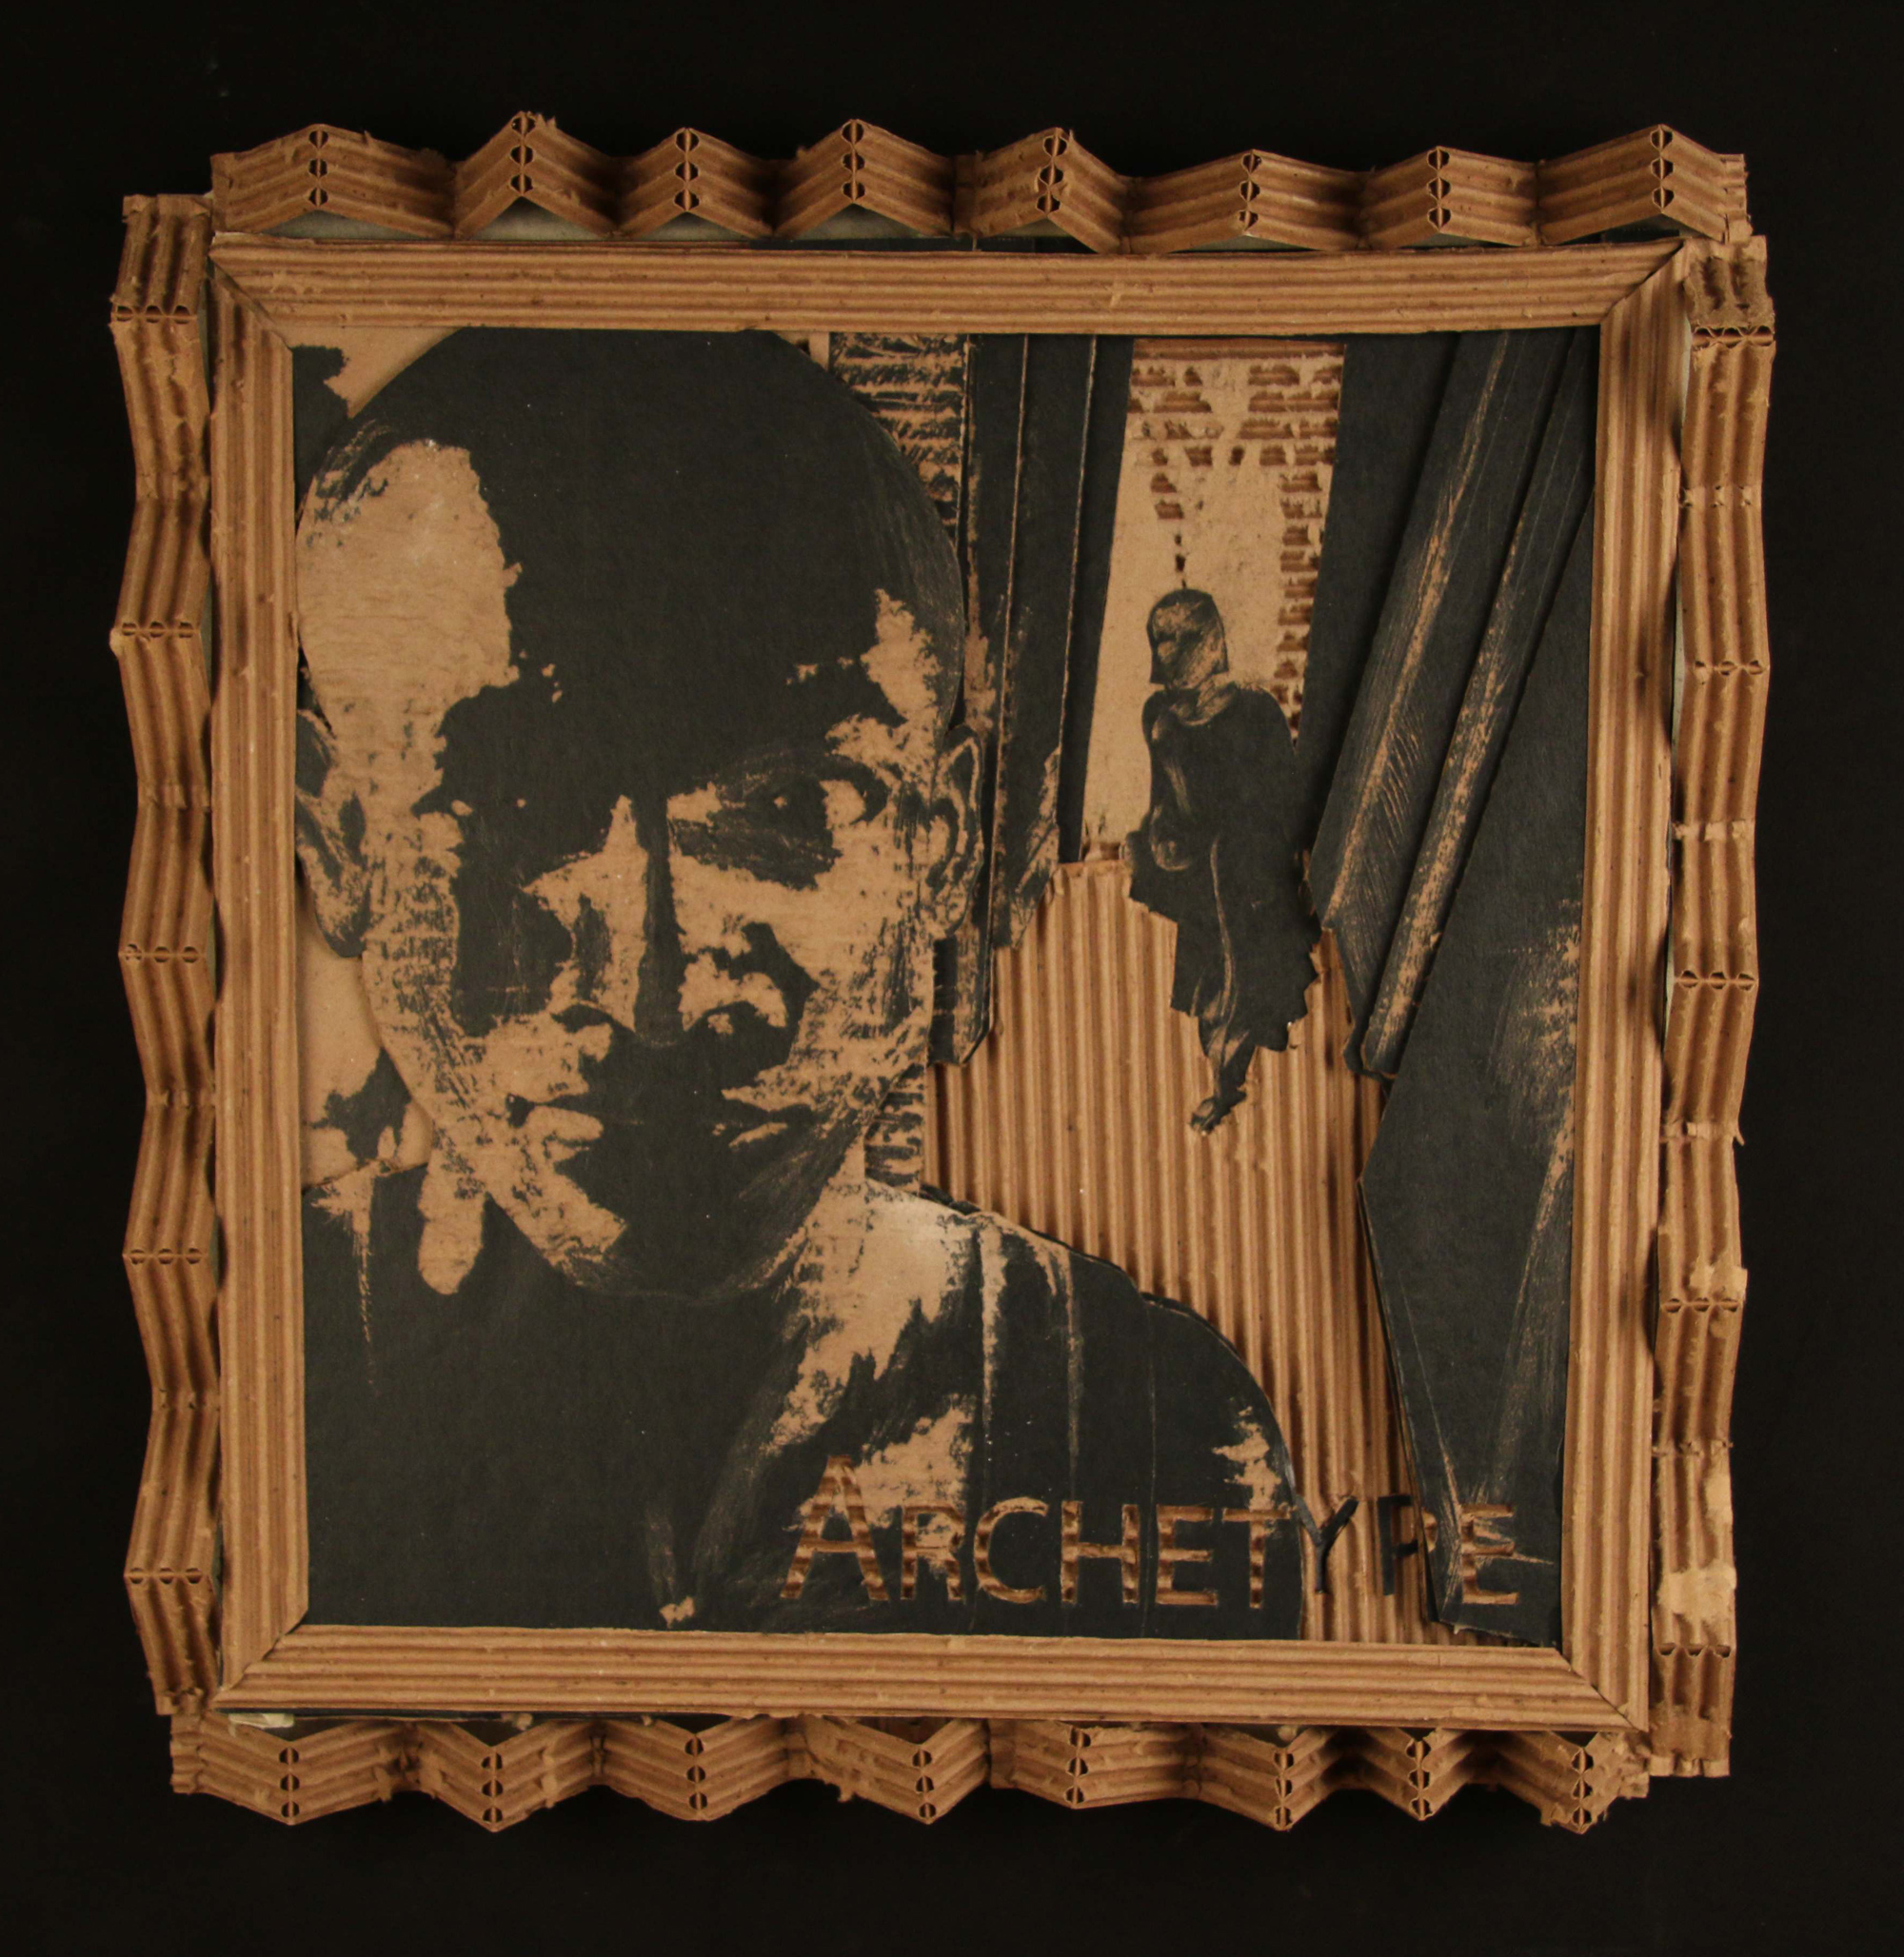
Cardboard Portrait

15MarquezStudent_2013smIn this project reclaimed cardboard is used to construct self portraits. The cardboard image and structure emphasize the importance of reusing and recycling materials and should provide an inspiring example of creative thought and innovation through repurposing materials.

Mission: Self Portrait

Develop a self portrait using an image of yourself, a word that reflects who you are, and cardboard. Any photo that shows a true likeness of your face can be used. A sheet of cardboard will be your canvas. The goal is to use a subtractive and additive method to develop a portrait using the layers of corrugated cardboard. The finished portrait should be a minimum of 11 x 17  inches. You may go larger.

Project Description/Outline:

  1. Begin with a photograph: A digital file will allow you to enlarge the image to fit your canvas. It will also allow you to add and compose text digitally.
  2. Prepare cardboard canvas. Sized to be fit with the chosen image. It is critical to have all image corners at 90º if you intend for the frame to be a true rectangle or square. Note: I usually refer to 90º corners as “square”.
  3. The image should be altered to black and white. This should be done to a point where the image is made up of positive and negative fields (areas). The average rendering can be made up of very little to no gray areas. This can be done by drawing or tracing the image paying close attention to these areas. You may expand the pallet to include multiple layers in accord with varying degrees of grey. Note: the image above has Three layers to develop the image: black, white and an exposed corrugated layer. Explore the possibilities.
*An alternative to this “hand and eye” design strategy is to put the image in photoshop and alter it to black and white and then the “Threshold” settings can be altered to get the image to your preference.
  4. Choose a word and font that best represents your personality. Develop them into your composition. The word or words must be at least seven characters.
  5. You will need to enlarge the image dimensions to the appropriate size.
  6. After a paper composition has been produced the image will need to be transferred to cardboard. Lightly mark the areas that separate positive and negative sections of the image. If you plan to strengthen the image quality with your own aesthetic this would be a good time to do so.
  7. Once transferred to the cardboard the image is ready to be developed by cutting, tearing and sanding away either the negative or positive areas. It may be necessary to darken the negative areas or pencil marks so they can be seen better in production. Your final image should have no pencil marks.Tearing and cutting away dark areas usually works best. What other methods can you explore and develop?
  8. Finally: Create a a frame of cardboard around your cardboard Portrait. 2 inch thick minimum. This can be done by layering strips of cardboard to create a thicker board. It is a good idea to experiment and create these strips/boards well in advance so they are ready when you are ready to complete the project. Be creative, What can be done to make the frame more interesting? Note: Exposed corrugated layers should be used as the face of the frame structure. The method demonstrated in class functions more structurally and can create an unexpected aesthetic to the project as a whole.
  9. Craft is important: Cuts and joints well executed. Clean up glue and pencil marks.

NOTE: Please refrain from cutting on table surfaces. Use a matt of cardboard or other material if you use the table. The floor works well to give one space to work and cut without damaging the table surfaces.

Research:

  • Low Relief
  • Rubber Stamps
  • Negative and Positive imagery
  • Cardboard: Material Properties
  • Texture by Exposing layers
  • Stencils
  • Screen Printing

Tools and Materials:

  • Utility Knife
  • Exacto or Hobby Knife
  • Cardboard
  • Card board paper
  • Pencils
  • Graphite
  • Adhesive (wood glue)
  • Masking tape
  • Transfer paper (optional)

Objectives:

Materials Characteristics:

  • Cardboard: Flat surfaces
  • Card board: Lamination
  • Laminated Layers
  • Skin
  • Corrugation (plains and patterns)

Concepts:

  • Elements of Design
  • Principles of Design
  • Composition
  • Texture
  • Pattern
  • Unity
  • Balance
  • Relief
  • Sensibility to form:
  • Representational Forms
  • Abstract Forms
  • Non-Objective Forms

Methods:

  • Technique
  • Cutting Safely
  • Thinking from 2-d to 3-d, layers
  • Organizing the surfaces of a corrugated cardboard plane to alternate between textures.
  • Developing Craftsmanship

Note: Use only Cardboard and Glue. No crayons, paints, chalks or inks. Factory pre-printed or pre-colored papers are fair game.

Create a label for your project with these specifics:

  • Name:
  • Dimensions: HWD
  • Materials:
  • Year Complete:
  • Course:
  • Tape your label in upper right corner of the back of your project.

Research/Inspiration: 

Project Gallery

Welding Line-Form-Repetition

Ward_72Mission: (Project Description)

Create a sculptural form/structure that develops from the linear quality of welded  and fabricated metal. The final form should have a sense of variety and repetition of elements. Add a skin to some or all components of the structure. Develop an aesthetic in the connection of skin to form.

It is expected that a concept be developed that will draw the viewer into a transformed space. A linear form should be the initial aesthetic, creating a structure that defines a new space. Lines, shapes and forms may be curved or straight, yet artist intent must be obvious and well crafted.

Sketchbook Assignment:

Sketches of your ideas should be rendered before and during sculpting. A minimum of five pages should be dedicated to this sketching component. Documentation is a critical learning habit. Not only does it record growth and provide reflection, it will foster new ideas. Printed images of inspirational sculptures or objects should be placed in your sketch book as well. Your sketch book will be graded along with your project.

  • Draw as you create.
  • Draw what you create.
  • Photograph as you create.
  • Take notes.

Fabrication:

Form: Beyond line, develop a composition that creates or entraps volume as shapes create form. Do not build a flat 2-dimensional drawing.

  • Welding will be the primary fastening technique.
  • Other fastening techniques are encouraged.
  • Welds should be clean. Relative: no Slag, no whiskers.
  • Use the grinder to clean your welds.
  • Re-weld if needed.

Skin:

Other materials are not only encouraged but expected. Greatly consider how materials are secured to the structure. Develop aesthetics in the way skins are connected and use them wisely and consistently. Look for texture in the materials search for. Add texture with other materials such as tar, acrylics, and resins.

Display:

  • Build a form that can stand on a surface, project off the wall or hang from the ceiling.
  • Choose and design wisely. Aesthetics and good design should be greatly considered.
  • When engineering, developing, and building fastening devices and supports for sculpture, stay away from obtrusive devices that may take away from the concept or aesthetics of the work.

Installation:

  • Make sure the design works.
  • If free standing, make a structure that is self supporting.
  • If the form will be a wall hung piece, a well engineered mounting strategy should be developed to secure the work to a wall.
  • If the form will be a ceiling hung piece, a well engineered mounting strategy should be developed to secure the work to the ceiling.
  • Allow space for fasteners such as screws to be tightened during installation.
  • Test your designs before final installation and critique.

Material/Structure:

Sculpture will be made of bent and welded 1/4 inch metal rod and other metals and “skin” materials introduced by the student.

Scale: (HWD)

A minimum of 30 ft of metal rod will be used for this project. Additional material may be purchased to build the form. Final Dimension of Sculpture: The minimum range to shoot for is 2 ft x 3 ft x 1 ft.

Craft and Aesthetics:

A high degree of craft is expected in the fabrication. If wall or ceiling mounted, remember to allow space for fasteners such as screws to be tightened with ease for installation. This is often missed and installation becomes difficult. The skins should be consistent and foster a cohesive visual conversation to the viewer.

Finish:

A metal finish should be considered for exposed areas. Ends of rod should be well finished/polished with a grinder. A polish, patina or paint may be used. Absolutely, no spray paint in the shop. If spray painting, work outside or in a spray booth. Place a protective material such as newspaper on all surfaces under and around the work area, even the concrete floor. Prep; clean, sand and use a primer before metal is painted. Most metals have an oil on them that will resist paint and surface treatment. It is a good idea to clean the materials before you begin the project. Sanding before cutting and welding will be beneficial.

Tools and Materials:

Safety Glasses
Measuring tape
Welding Eye Protection
Welding Gloves
Welding Leathers (option: thick flannel shirt)
Angel Grinder
Grinding disc, Cut off disc, Flap Disc
1/4 inch rod/ Mild Steel Hot rolled (HR)
1/8 inch rod/ Mild Steel Hot rolled (HR)
Wire: Rebar Wire (good for modeling form or fastening)
Sand paper/ steel wool
Solvents, To clean oil off the metal
Finishing materials, Primer, Sealers/Paint.
Other materials for skin and attaching materials (Wire, string)

Create a label for your project with these specifics:

  • Name:
  • Dimensions: HWD
  • Materials:
  • Year Complete:
  • Course:

Tape your label to your project. Use masking tape so that it will not harm your project.

Caution:

Protective Gear required: Wear appropriate eye protection, clothing and shoes while welding. UVs from the welders can burn skin and damage eyes, much like the sun, not to mention the metal will be hot after a weld. Use leather welding gloves while working around the metal shop. Assume that metals are “Hot” before picking them up. Be careful when picking them up.

Fumes: Be aware that some metals can be hazardous and some are not compatible with others, In other words lets stick with what we know, steel. When welding, stay away from anything covered in a zinc allow, such as galvanized metals. Galvanized metals can be potentially dangerous, as the zinc will form a thick vapor that is hazardous to our health.

Research:

Lee Bontecou
Eric Stephenson
Alexander Calder
Robert Klippel
Lynn Chadwick
Sol Lewitt
James Turell
Rebecca Horn
Antony Gormely
Rachel Whiteread
Richard Serra
Joseph Beuys
Bruce Nauman
Tony Cragg
Piet Mondrian

Project Gallery

Texture Switch

Bader2

Mission: (Project Description)

Within this project, we will bring into question the “skin” of an object, and how alterations to it, alters our own perceptions of the object.  Many artists, such as, Meret Oppenheim, Lucas Samaras, and Joseph Beuys, have pursued this concept creating works that question or negate an objects original function.  The simple manipulation of a surface can allow strong conceptual narratives to develop, speaking to a greater importance beyond the original object.

Transform: v.  1 make a thorough or dramatic change in the form, appearance, character, etc.

Mission:

  • Bring to class three (3 dimensional) objects.
  • Object should not be smaller than 12 inches or larger than 24 inches.
  • A class discussion of objects will occur.
  • Consider the objects conceptual importance relative to its potential transformation.
  • Select one object from the initial three. Select the object with a strong visual presence.
  • Students should select one material in which to cover the chosen object.  This material should be an antithesis to the original object, or draw into question the function or accepted meaning of the object.
  • Repetition and a obsessive development of the surface is a critical component of developing this project. Choose a material that will draw emphasis to this concept.
  • Objects must be completely covered by the chosen material. Students should focus on the obsessive nature involved in covering the objects.

Project Vocabulary: 

Pattern
Texture
Variety
Rhythm
Direction
Movement
Repetition
Contrast
Natural Texture
Visual Texture
Worked Texture

Writing Assignment:

Use the vocabulary on the previous list along with other elements and Principles of Design to describe and interpret your work. The writing assignment should include your critique on the content and context and how these factors contribute to the concept of the work you have created. A general description of formal qualities should be addressed as they pertain to the concept, yet a stronger focus on content, context, and of course the idea (Concept) will foster a stronger discussion.

  • Look at the work analytically.
  • Remove yourself from the work to create new perspectives.
  • Be attentive to your gut reactions to the work.
  • Make notes of your observations” as reference. (In your sketch book)
  • Insert an image or sketch of your work within the word or pages document.
  • Content: Three to four paragraphs of text should be written before adding images.
  • Note: A paragraph is made up of three to five sentences.

Tools and Materials:

  • Eye Protection/Safety Glasses
  • Sketch Book
  • Utility Knife
  • Hobby knife
  • Dust Mask/Particulate Respirator
  • Safety Glasses
  • Focus Object
  • Materials for skin
  • Mixed media
  • Adhesives or other fastening materials
  • Rubber or Latex gloves (optional)

Create a label for your project with these specifics:

  • Name:
  • Dimensions: HWD
  • Materials:
  • Year Complete:
  • Course:

Tape your label to your project. Use masking tape so that it will not harm your project.

Objectives:

  • Method: Planning, Cutting Safely, Building techniques and strategies
  • Material Characteristics:
  • Three-Dimensional surfaces and skin transformations
  • Aesthetic qualities
  • Sensibility to form: Good design, clean aesthetics
  • Integrity of the artist to their craft
  • Concept from objects

Evaluation:

  • Work ethic: Participation in and out of class
  • Scheduling: Students stay on task, project finished by deadline, critique.
  • Craftsmanship and aesthetics.
  • Attention to detail and craft involved in the development of the object’s “skin” will be taken into consideration during grading and critique.  Therefore, ample time should be devoted to the completion of the project.

Caution:

This process may use chemicals and materials that might be dangerous for some people. Read the MSDS (Material Safety Data Sheet) for questionable materials. A respirator should be used when materials off gas or fume. A dust mask may be used rather than a respirator. The respirator will provide better protection.

Research/Inspiration: 

Project Gallery

Wood Carving: Merging Early and Contemporary Icons

FelliniwebMission:

In this project create a wood carved mask that visually merges early and contemporary icons. The mask should take on a combination of both icons chosen. The main material will be wood, other materials can be used to embellish the form. Try to use materials that are a part of our current culture. Accumulated objects or components of devices we use might be good resource. A visit to the salvage yards will be a good resource as well.

Guidelines:

  1. Build and carve a mask which merges an icon form the past and an icon from the present.
  2. Process: The finished sculpture should be built through the use of wood lamination and carving.
  3. Wood purchased or found for this project should have No nails or Staples, If you find them in the wood remove them and have the instructor approve before cutting with saws or equipment. Non chemically treated wood only. Suggested material is two by fours, but obviously there are other sizes that may work to your advantage.
  4. Scale: A minimum of 1.5 ft in one dimension (HWD). A good starting point would be purchasing or having on hand two 8 ft two by fours.
  5. Finish: You may decorate your carved mask in accord with your selected icons.
  6. Students are strongly encouraged to combine or evolve the project using other materials and media to complete the finished form. Take chances.

Overview: 

This project should include a design that incorporates wood lamination and carving. No metal fasteners, such as nails and screws should be used in the lamination process of this project. Nails, screws and other metal fasteners can damage chisels, equipment blades and other carving tools. The design should be built in a manner that presents a relevant conclusion to the subject, two chosen icons. Your mission is to build a form that acts as a symbol in resolve of  your creativity towards the concept.

Engage, Invite, excite, challenge, your audience to react to your work.

Function, Engineering and concept: An understanding of the material, process, and concept should be a major concentration for this assignment.

Materials to purchase or acquire for this project.

2-3  two by fours: Pine or cedar is a soft wood that can be easily carved.
Ratcheting Straps (2)
Sand paper
Wood rasps, Chisels
Wood Glue
Finishing materials
Paints and Sealers

Safety:

Wear appropriate eye protection, clothing and shoes while working with wood equipment.
Wood shop tools can be very sharp.
Be aware of peers working near and where you are aiming your tools.
Do Not Use “Treated Wood” in the studio. Stay away from a treated lumber. Some lumbers have arsenic as a treatment.

 Writing Assignment:  

As a beginning level course, the student is responsible for developing and presenting a typed research paper of their work for this assignment. The final document should include a description of themes/concepts the artist is addressing, descriptions of how the artist uses imagery, materials and material qualities to address their themes, images of the artist’s works and other supportive documentation. The processes and techniques the artist utilizes to create their work may also contribute to the research.

Writing Assignment Guide Lines:
Below is a brief outline of format and what is expected in your writing assignment.

  1. Cover sheet:
    1. “Your Name”
    2. Research Title
    3. Sculpture 1
    4. “Semester and Year”
    5. “Instructor’s Name”
  2. Body: (500 words +)
    1. Introduction Paragraph
    2. Your research
    3. Images of your work
    4. Summary
    5. Bibliography: Cited text and images.
  3. Images
    1. Images can be printed within the body text
    2. Images can be printed on pages after the body text
    3. If you have trouble placing images in your Document, Please see me.

Sketch Book: Merging early and contemporary icons.

1.  Find and print- 10 images- early masks
2.  Find and print-10 images- contemporary masks
3.  Add images to sketchbook
4.  Generate 6 full pages of sketches, combining early and contemporary masks.

Processes

1.  Select sketches to model your concept in clay
2. Wood lamination with 2×4’s and other wood materials
3. Begin Carving: This may be an additive and subtractive process.
4. Design and fabricate a method to wear the mask. Welding and other methods may play a part here.
5. Paint and embellishments
6. Consider the antiquity of your form is this a new mask or does it have a sense of history.
7. Dance and Performance: Develop an interpretive performance: Solo or Group engagement

Research and Inspiration:

Anthropomorphic(having human characteristics)
Thai Masks
African Masks
Bundu helmet mask
Lewa spirit mask
Mumuye mask
Biombo helmet mask
Luba Style Mask with Brass Made in Ghana
Djibouly Mask Made in Mali
Aztec mask
Northwest Coast Masks: Native American mask
Venetian Masks
Japanese Masks
Jake and Dinos Chapman
Ron Mueck
501st Legion “TK Project” Stormtrooper Helmets
AJ Fosik

Videos:

Sharpening wood carving tools

Plaster Carving Non Objective Form: Abstraction Morphing/Transformation

Wheatly_MMission: (Project Description)

Using two forms build one, morphing the forms together to become a non-objective or abstract formal composition. The original forms are to be used as inspiration to assist in guiding the form. Use elements from each, yet develop your sculpture as a unique entity with an elegant form and a clean aesthetic. Original chosen objects may be mechanical (man-made) or natural.

  • Bring a wire cloth hanger and nylon stocking. This will be used to build a non objective form to base your carving to. The wire will be an armature for the nylon which will become a surface and skin.
  • Bring two interesting objects from home, which are approximately the size of your hand. Objects may be mechanical or organic.
  • Bring a container to build a blank. (1 gal. container.)
  • Create a blank from plaster.
  • Brain storm and Sketch ideas.
  • Plaster Carving: Create an abstract form from objects and sketches.

Sketchbook Assignments: (Five pages)

  • Assignment 1: Sketch original objects in your sketchbook. (3 views of each, 2 pgs)
  • Assignment 2: Preliminary and in process sketches of plaster form. (3 pages)

Additional Criteria: Strategies, Technique and Composition: (Project Description)

  • Clay may be used as a modeling/sketching tool: Sketches do not always start in the sketch book. Model, in clay an abstract form, drawing characteristics from your two objects. This will assist you in developing the composition. Images of these moquettes may be placed in your sketchbook and are valid sketches.
  • This project relies on the elements of light and shadow. Carve so that light and shadow create the dynamics of the form. No paint, pigments or inks should be used for this project.
  • Use repetition, directional curves and form to create a since of movement.
  • Develop a composition with movement that will draw the viewer around and into the form.
  • Use models, sketches and your own intuitive inspirations to create. Process will play a great part in your exploration as you learn the material, developing carving techniques and sensibilities.
  • Think about how these objects work together to create one form or how one may seem to dominate over the other, seeming to swallow or assimilate.
  • Craftsmanship: Elegant form and a clean aesthetic should be a goal.
  • Pay attention to building a form that has interior definition as well as exterior. Carving and modeling in the interior of the object will challenge your abilities, as always you are encouraged to push beyond the average.
  • Do not leave any indication of the container of your original form. Work the whole form.
  • Remember its okay to go back to sketches drawn or sculpted to alter and redesign your composition as you work through the project. This is a part of the process.

Tools and Materials:

  • Clay for sketching (Plasticine)
  • Plastic or wax Container- Bring your own. Plastic or wax coated.
  • Pottery Plaster No. 1
  • Sanding Screen (Drywall Sanding Screen or sand paper)
  • Sketchbook
  • Plaster Drywall wrasp
  • 8” Rasp- Purchase at art, wood or craft stores
  • Other Scraping Tools: Spoons forks, Files, Knives, Drill
  • Clay trimming tools, spoons, knives, forks, old saw blades (be inventive)
  • Dust Mask

Project Critique:

  • Project should be finished before the beginning of class critique session.
  • Projects will be discussed during the critique.

Think About:

  • The Elements of Design: line, texture, shape, light, form, space, time,
  • The Principles of Design: balance, proportion, rhythm, emphasis, and unity
  • Exterior vs. Interior, Primary and  Secondary Contours, Positive & Negative Forms, Static and Dynamic Forms

Photographing your work:

Photograph your work: A minimum of two types of images of your object should be made and emailed to the instructor of this course.

As an artist, a good portfolio will always set you apart from the rest of the crowd. When it comes to artist portfolios, pictures of your artwork are usually the first time a person may be introduced to your work. The images you provide are usually what make the biggest first impression. There for, it makes sense to practice photographing your art at the beginning and throughout your art career.

Image 1: 3-D portfolio image:

Neutral Setting Studio Shot: Should have no visual relationship to other objects. One should not be able to determine the size of your finished form. Good composition, good lighting and the best representation of your object is the goal. Minimize unnecessary shadows and highlights. A grey screen and lighting is available in room FAC 183. Take many shots of several sides of the piece. View them all on a computer screen before editing to the best.

Image 2: Creative Monumental Composition Using Forced Perspective:

Create the illusion that your sculpture is monumental by using forced perspective. Forced perspective techniques manipulates our human perception with the use of optical illusions to make objects appear larger, smaller, farther, or closer than they actually are. Movie makers sometimes use forced perspective to turn plastic toys and other objects into gigantic forms and characters we see on screen. The use of digital effects today still incorporates this popular way of portraying scenes or objects. A search on the web should gain several hits on strategies for creating a forced perspective image.

Before Critique:

Write a short paragraph about the form.

  • Descriptive, poetic, narrative…..What is or can the piece be about?

During Critique:

Reactions to work done by peers.

  • Use your own dialogue and the following:
  • Reactions to form: Positive reactions-Negative reactions
  • Sensibility to form:
  • Elements of Design:
  • Principles of Design:
  • Concepts: What ideas come to mind when you look at the object?
  • Relax: Keep an open mind.

Research/Inspiration:


Project Gallery